How to Get Started with Play @ Work
Welcome to Play @ Work! This guide will walk you through setting up your account, adding team members, and customizing your settings to get the most out of the platform.
If you haven’t created your account yet, follow these steps:
Your account is now ready for use!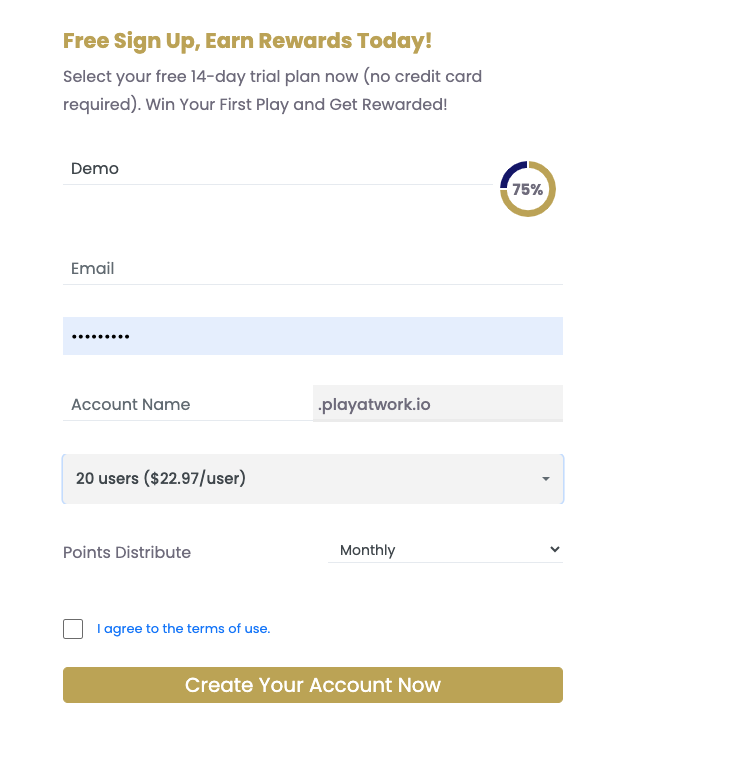
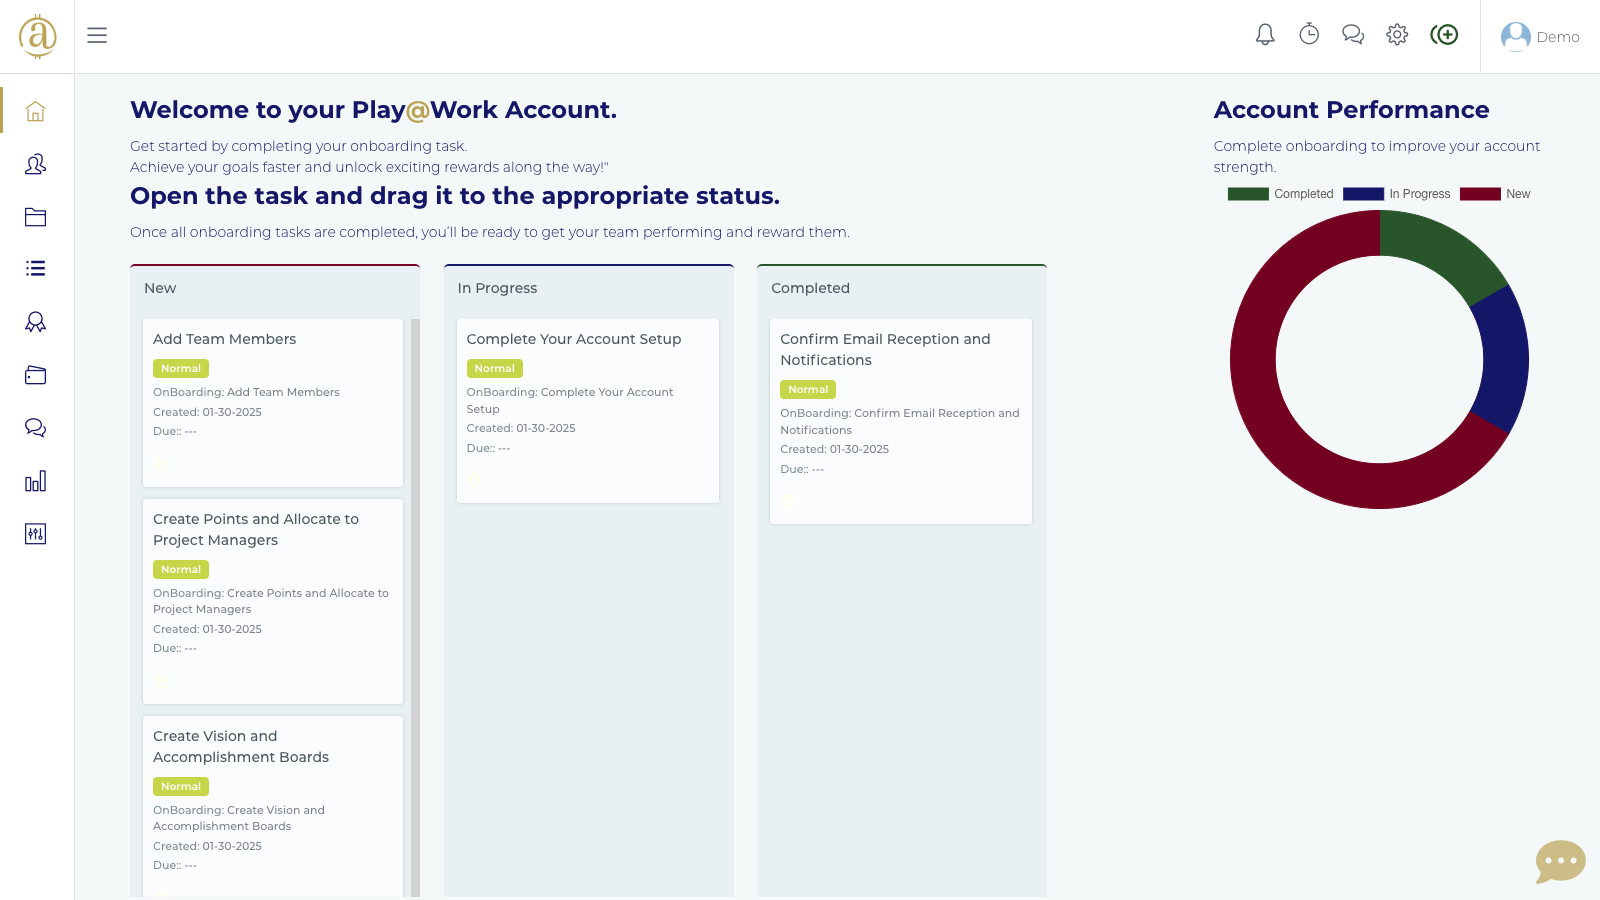
Onboarding tasks play a critical role in ensuring a smooth and successful integration into Play @ Work. Completing these tasks helps new users familiarize themselves with the platform, understand workflows, and maximize efficiency. This guide explains the importance of onboarding tasks and their impact on both individual and team success.
Faster Adaptation
Onboarding tasks help users quickly learn the key features and functionalities of the system.
Completing them ensures a seamless transition into their role.
Increased Productivity
Understanding the platform early on allows users to be more productive from day one.
Reduces time spent asking for guidance or troubleshooting basic functions.
Alignment with Company Goals
Tasks ensure that users follow standardized processes and workflows.
Helps align team members with company expectations and objectives.
Avoiding Delays and Errors
Skipping onboarding tasks can lead to miscommunication and workflow disruptions.
Ensures that users correctly configure their accounts and tools.
Account Setup
Profile completion
Notification preferences
Security settings
Platform Training
Understanding dashboard navigation
Learning project and task management tools
Exploring reporting and analytics features
Role-Specific Tasks
Accessing role-based resources
Completing required documentation
Setting up collaboration tools
First Task Completion
Practicing system workflows by completing a sample task
Submitting an initial report or project
Once your account is created, the next step is to add your team members.
Play @ Work comes with pre-defined roles, but you can customize or create new roles to fit your needs.

5. Assign an hourly rate to each user.
You can assign an hourly cost to each team member. This cost will be automatically factored into any project they're assigned to, allowing you to accurately track and estimate time-related expenses in your project cost breakdowns.
You can modify existing roles or create custom roles to tailor permissions and access levels.

Personalize your Play @ Work account by adding your company logo.
Your logo will now appear throughout your account for a branded experience.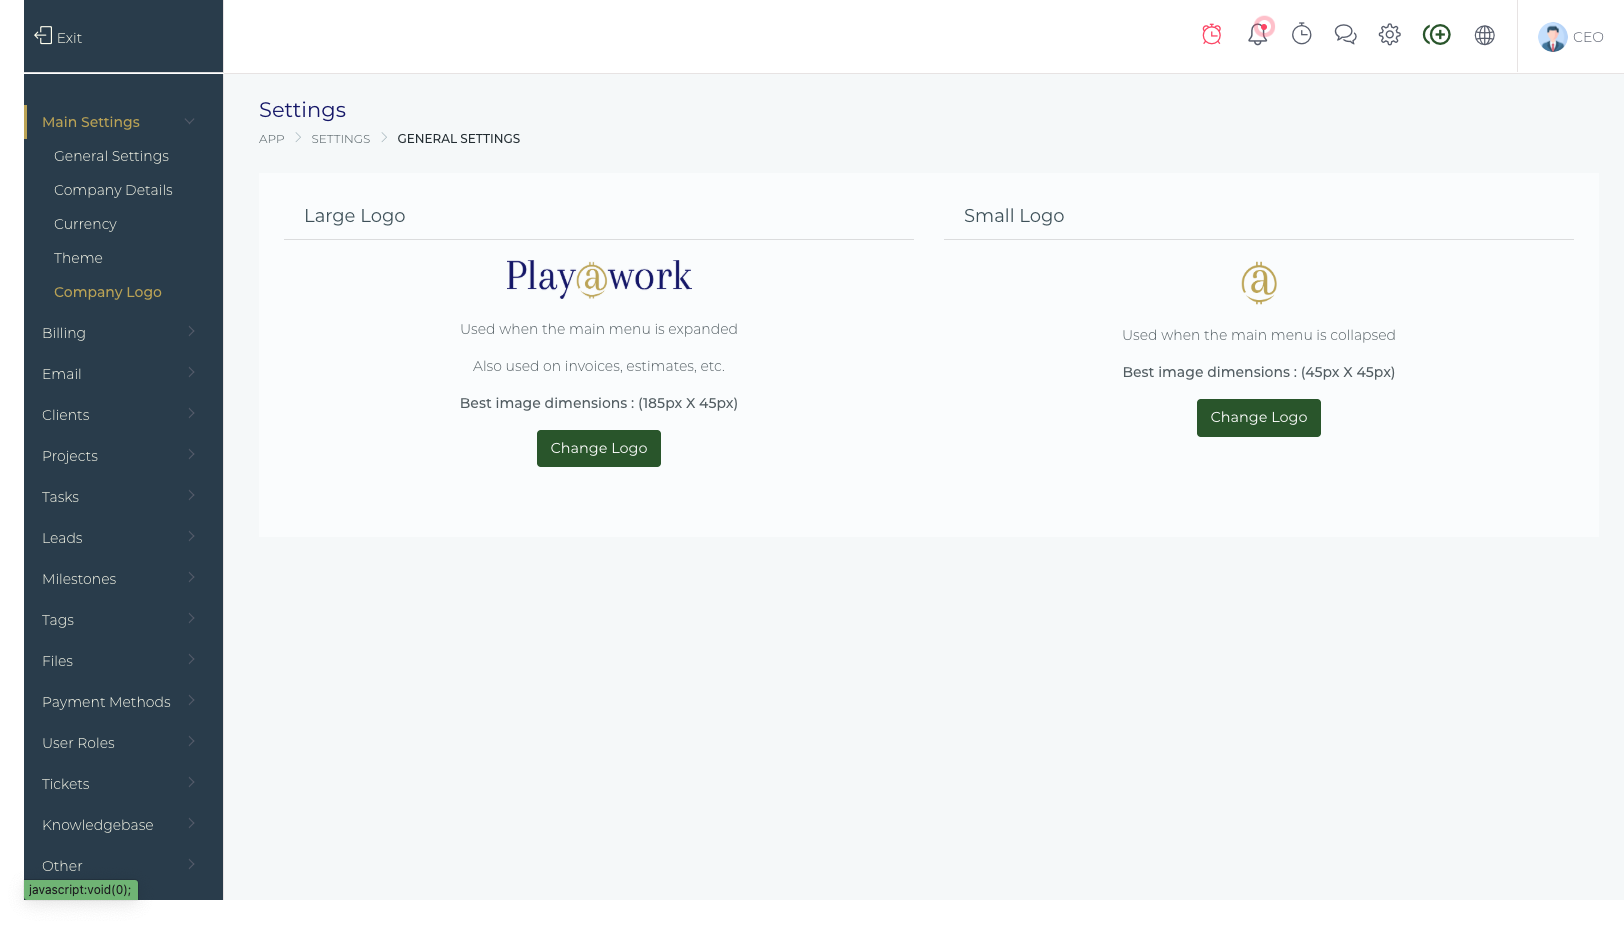
Align your points system with your company’s currency for simplicity.
We recommend matching the value of points to your currency for consistency.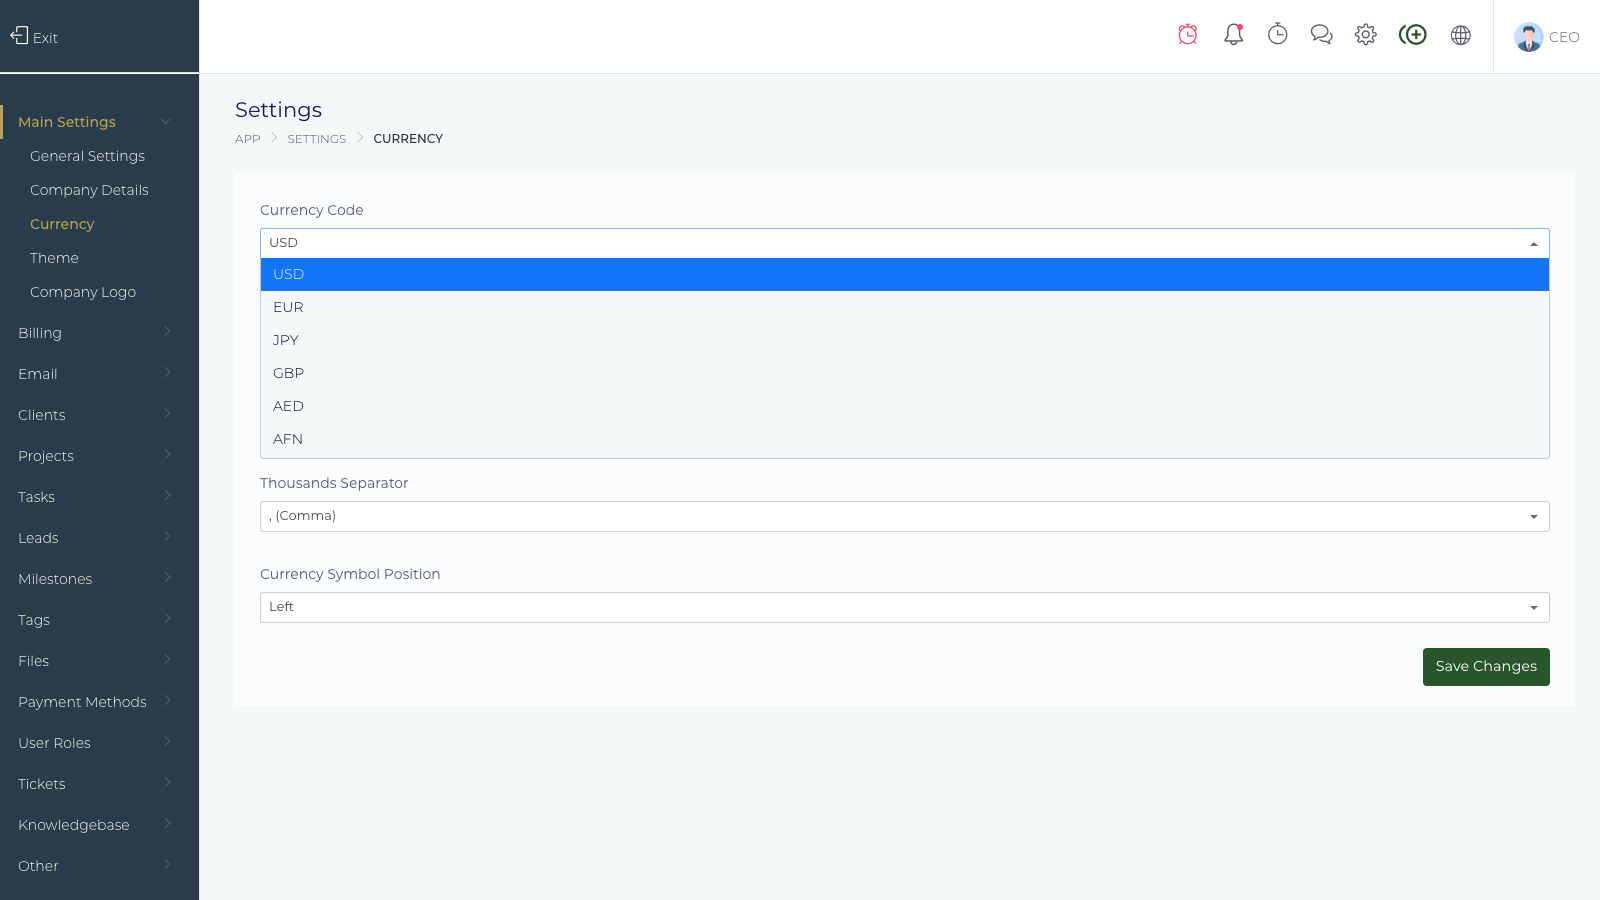
Need Help?
For additional guidance, explore our Knowledge Base or reach out to our support team. You can also watch our training videos for step-by-step instructions on specific features.
Thank you for choosing Play @ Work. We’re here to help you succeed!
This article details the capabilities and process for managing Administrator Users—the highest level of access—within the Play at work.io Platform.
The Play at work.io Platform features a core, built-in role known as "Administrator."
What it means:
Users assigned to this role are automatically granted all permissions and complete, unrestricted access across every area of the platform.
Administrators can manage settings, access all organizational data, modify user roles, and perform all other system-level operations.
Security Advisory: You should only add a user to the "Administrator" role if you are confident they require this full, comprehensive level of access and control over your organization's instance of Play at work.io.
To grant another team member full administrative privileges, follow these simple steps:
Access the Settings Menu:
Log in to your Play at work.io account.
Navigate to the menu (
Go to Team Memebers:
Select the Team Members or Users section from the settings sidebar.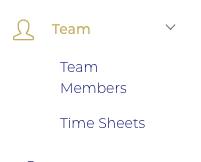
Create or Edit the User:
If the user is new, click + Add Team Member and enter their details.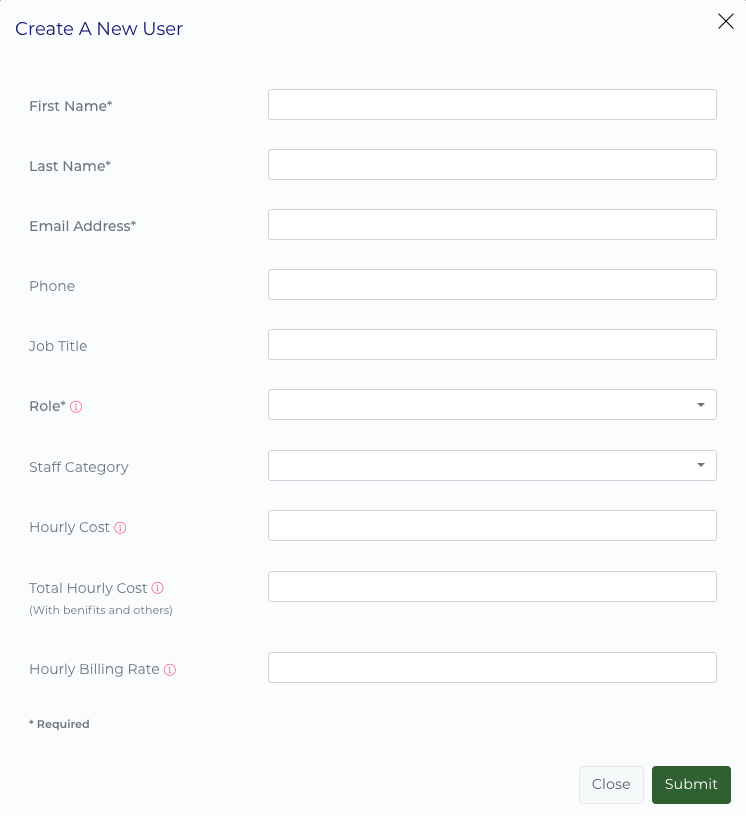
If the user already exists, click to Edit their profile.
Assign the Role:
In the user's profile settings, locate the User Role field.
Select the designated role: Administrator.
Save Changes:
Click Save or Update to apply the change. The user now has full administrative access immediately upon their next login.
Staff, Project Manager, and Finance Manager Actions in Play @ Work
Play @ Work provides distinct roles and responsibilities for Staff, Project Managers, and Finance Managers to streamline workflow, improve productivity, and enhance collaboration. Below, we’ll break down the actions and permissions associated with each role.
Staff members, also known as executors, are responsible for completing tasks and contributing to projects. Here are the key actions available to staff:
Project Managers oversee tasks and projects, ensuring quality and timely completion. They bridge the gap between staff and administrative roles. Here’s what they can do:
Finance Managers handle financial tasks, including point redemptions and payout approvals. Here’s what they can do:
Play @ Work’s role-specific actions for Staff, Project Managers, and Finance Managers ensure that tasks, points, and collaboration are handled effectively. By clearly defining these responsibilities, the platform helps organizations achieve their goals while fostering teamwork and accountability.
For more detailed guidance, check out our additional Knowledge Base articles or reach out to our support team.
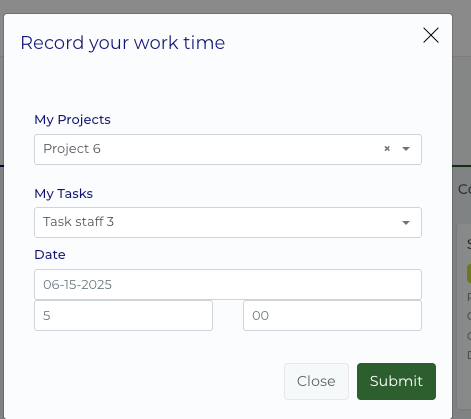
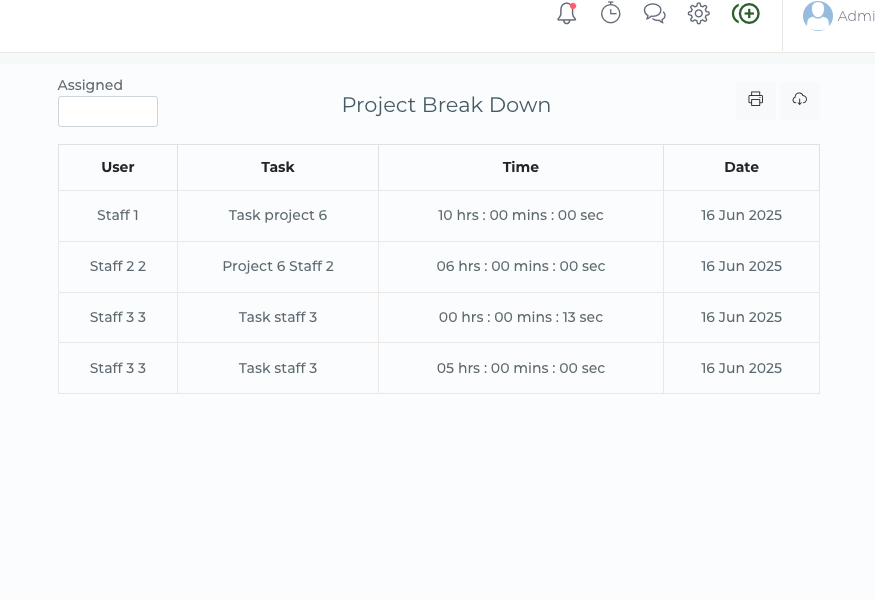
Tracking Project Time Costs with Hourly Rates
In Play at Work, each user can have an hourly cost assigned to their profile, set by an Admin. This rate represents the cost of their time and is automatically factored into any project they are part of.

When team members are added to a project, Play at Work calculates the average hourly cost based on the hourly rates of all assigned users. For example:
Staff Member 1: 30X/hour
Staff Member 2: 35X/hour
Staff Member 3: $30/hour
Project Manager: $35/hour
Avg hourly Staff Cost : $32.50
This average hourly cost is then used to calculate the financial investment in real time.
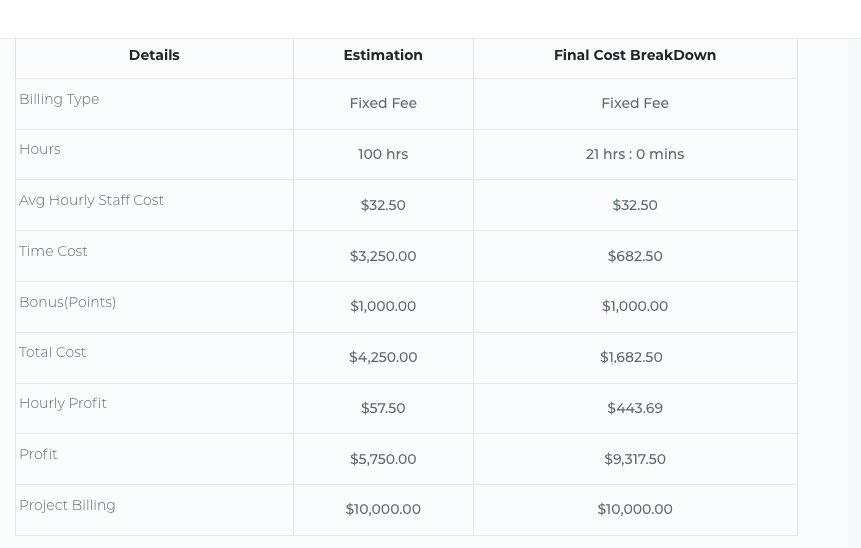
As team members log time on their assigned tasks, Play at Work multiplies the logged hours by the average hourly rate.
This allows you to:
Monitor real-time project labor costs
Understand how much time and money is being invested
Instantly see if you're profitable or losing money on a project
This feature gives you immediate insight into project costs and helps you make smarter decisions based on time and resource allocation.
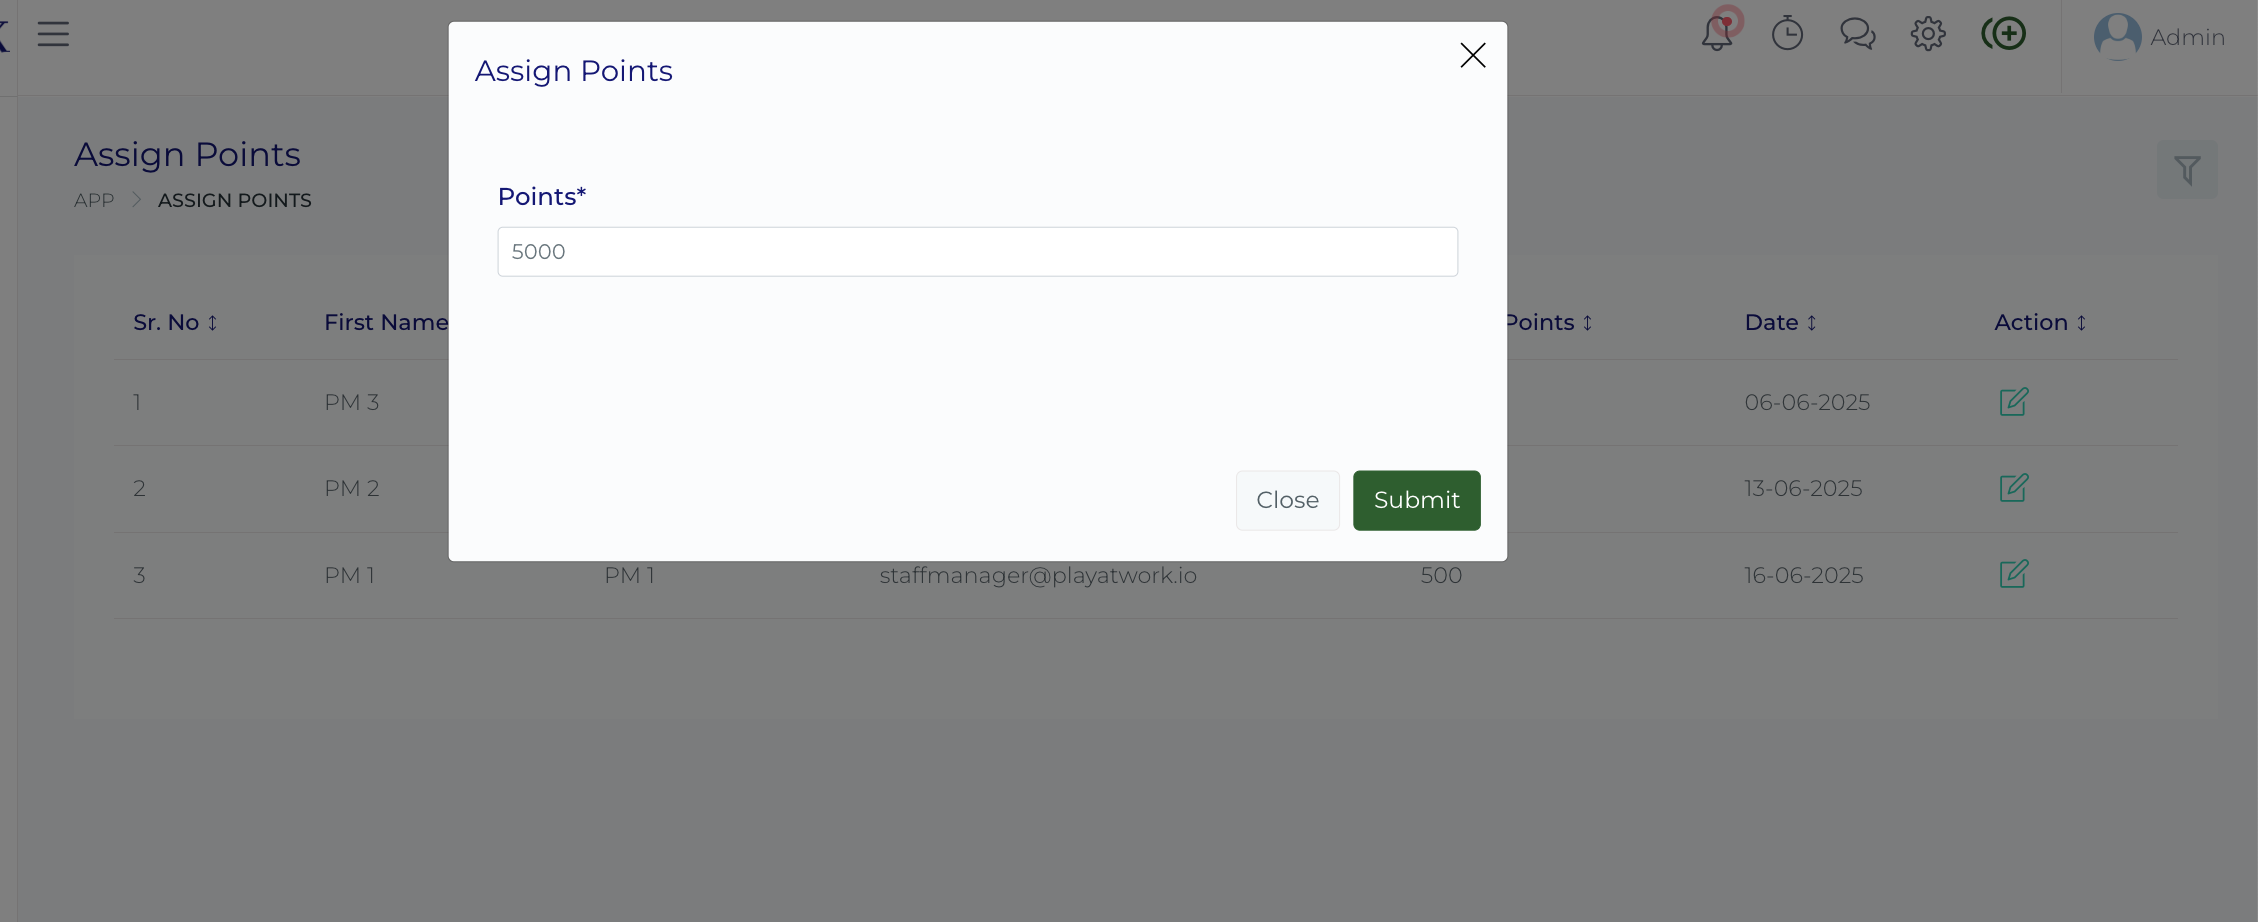
Creating and Managing Points in Play @ Work
Points in Play @ Work are designed to motivate employees, reward achievements, and drive performance. Administrators and Finance Managers oversee point allocation, ensuring fair and strategic distribution. This guide covers how to create, assign, manage, and redeem points effectively.
Administrators or Finance Managers can create points to set budgets for projects and tasks.
Navigate to the Points Module:
Log in as an Administrator or Finance Manager.
Go to the "Company Points" section in the menu.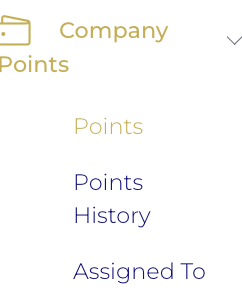
Create a Point Budget:
Click on "Points."
Add the total number of points allocated for a project or global budget.
Set Point Values:
The value of points is equal to the currency selected in your account settings.
Once points are created, they can be allocated to Project Managers for specific projects.
Select a Project Manager:
Go to the "Assigned to" section to locate the points allocated to the Project Manager. The Project Manager can then redistribute these points among their team members across the projects they manage.
We recommend establishing an internal rule that grants Project Managers a fixed percentage of points from each project they oversee. This promotes fair and transparent distribution of contributions and rewards.
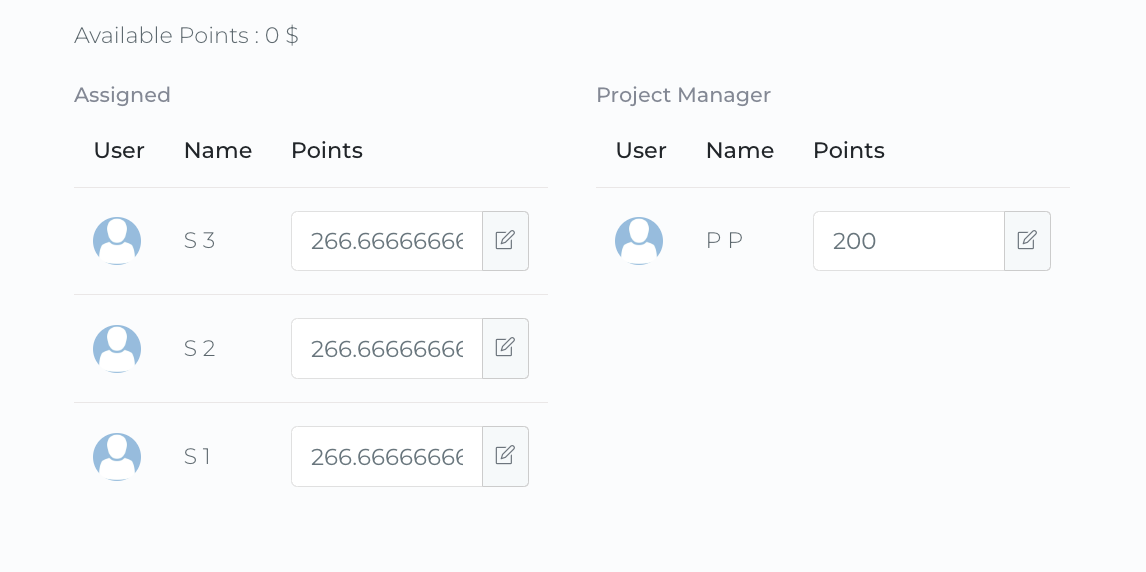
The Project Manager assigns points to specific projects and contributors.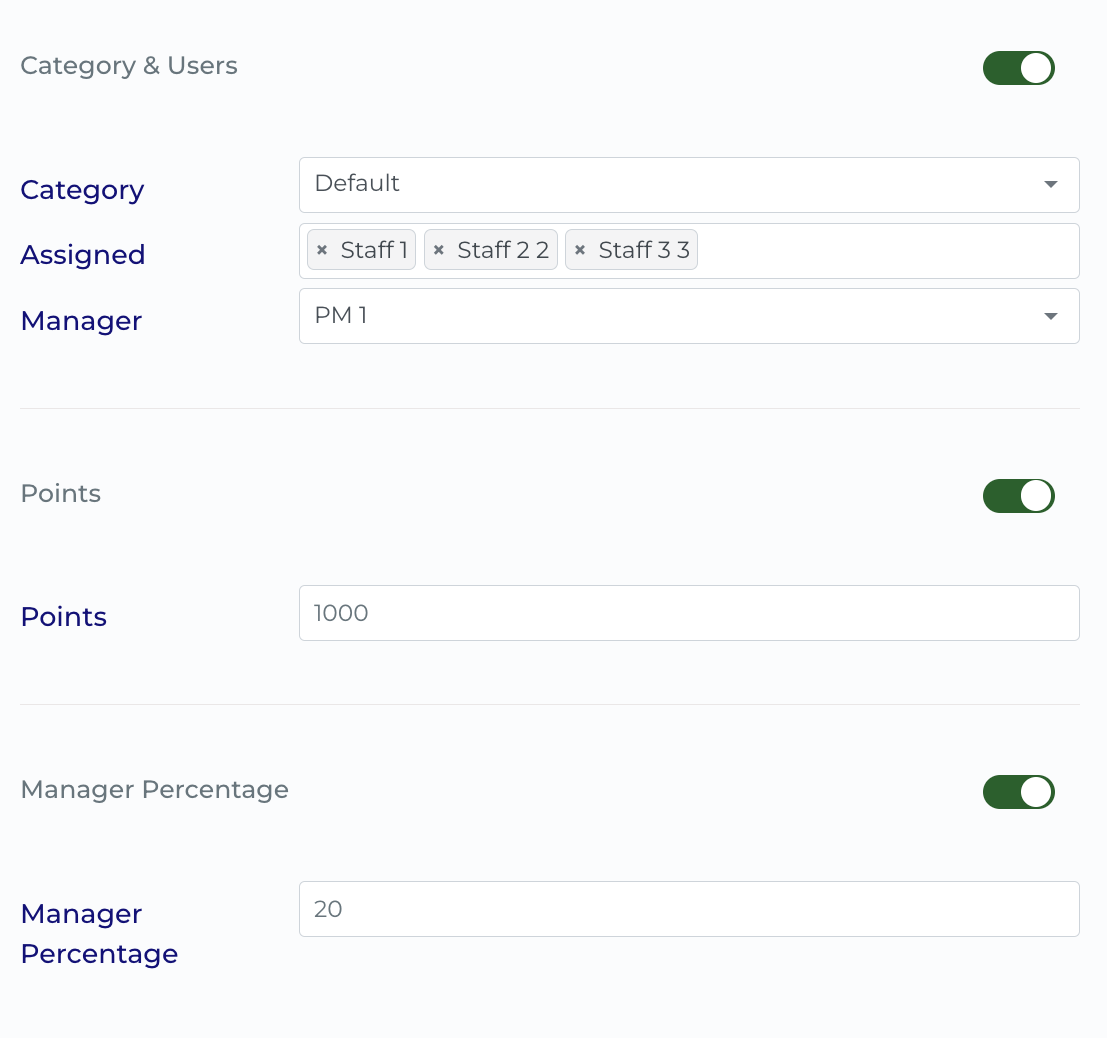
Points and bonuses are only awarded once the project is marked as completed.
How Points Are Finalized:
Project Completion Approval:
Once a project reaches "Completed" status, points move from the Upcoming Points section to the Pending Approval section.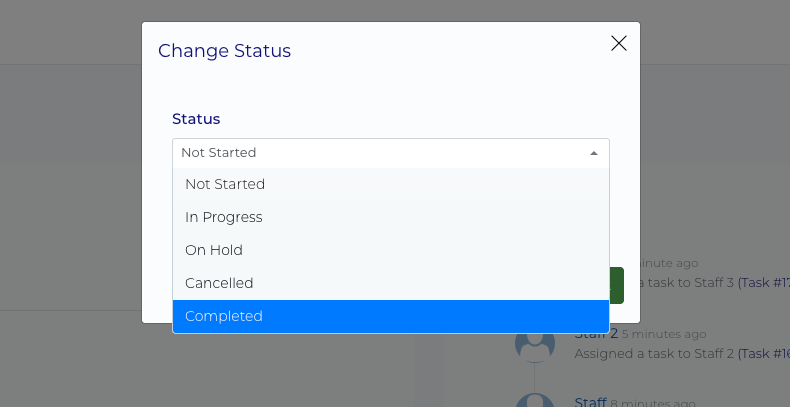
The Project Manager reviews project performance and determines how points will be distributed.
Adjusting Point Distribution:
The Project Manager can decide if the users merit 100% of the point budget or a reduced amount.
If a team member underperforms, their share of points can be reduced or removed directly from the project points section. Simply click the edit icon and adjust the point allocation accordingly.
If the project's final profit is lower than expected, the Project Manager can allocate only a percentage of the points (e.g., 50%).
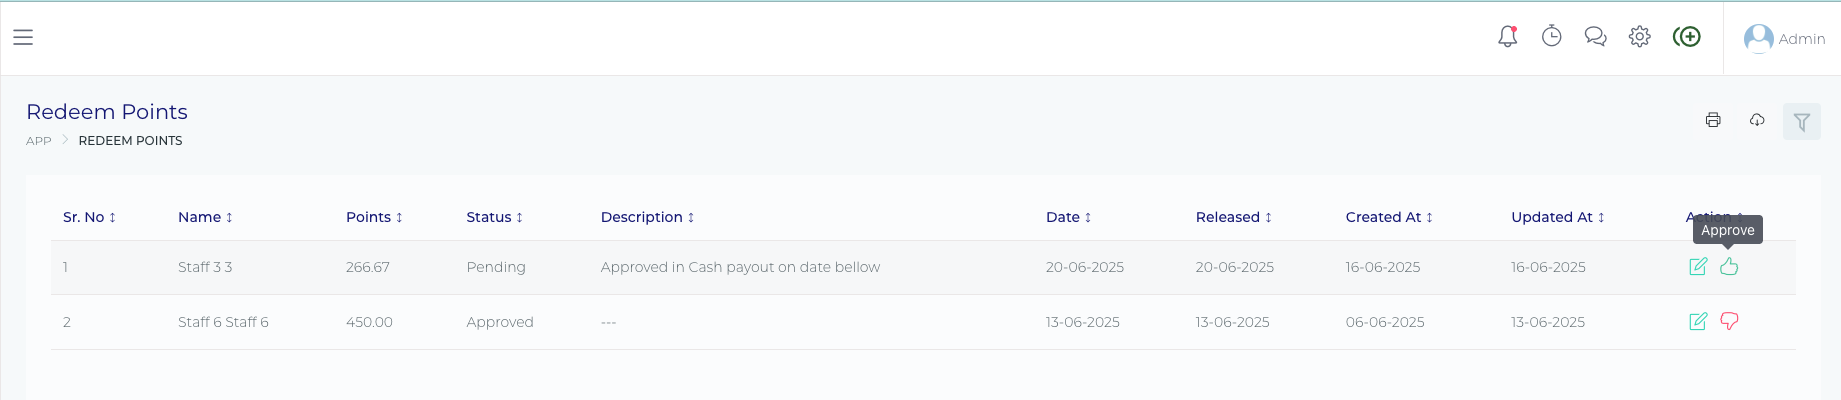
Once points are approved and transferred to a user’s wallet, employees can redeem them for rewards.
Access the Redeem Points Section:
Users navigate to the "Wallet" section to check their available points.
Click on "Redeem Points" to start the process.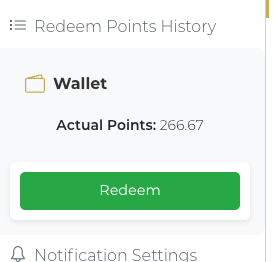
Redemption:
The minimum redeemable amount is 100 points.
Approval Process:
The Administrator or Finance Manager reviews and approves the request.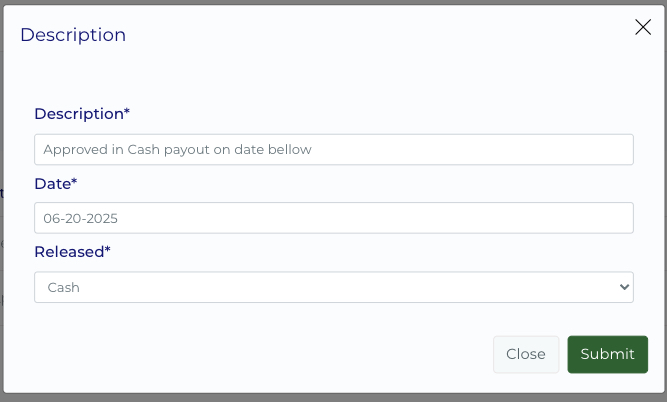
Finalizing the Redemption:
Once approved, the redeemed points are deducted from the user's wallet. For example, if a user redeems 500 points and has exactly 500 points in their wallet, their available balance will be 0 points.
Users receive a notification when the status of their redemption request is updated by the admin.
All approved redemption transactions are recorded in the Point History for reference.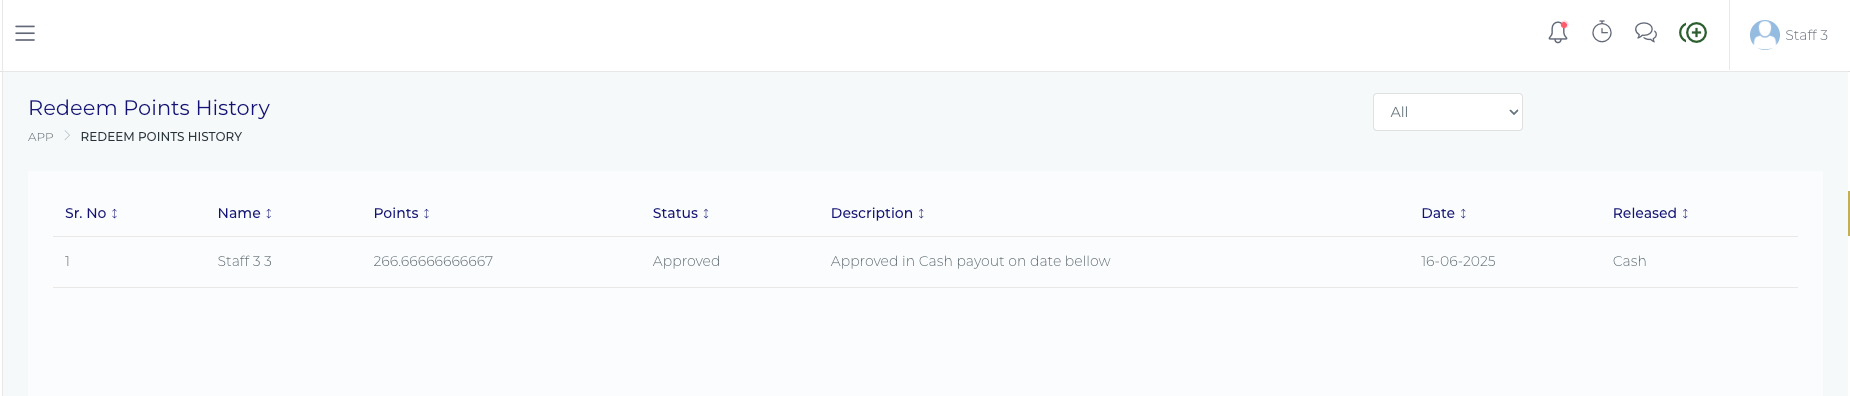
Administrators and Finance Managers must track point distribution and make real-time adjustments.
View Point Usage Reports:
Access the "Points History" section in the Company Points module.
Review how points are being allocated, pending, or adjusted.
Modify Point Allocations:
If additional points are required, navigate to the "Points Management" section.
Adjust the point budget before final approval or add post-project bonuses by modifying the points per user in the Project Editing section within the project.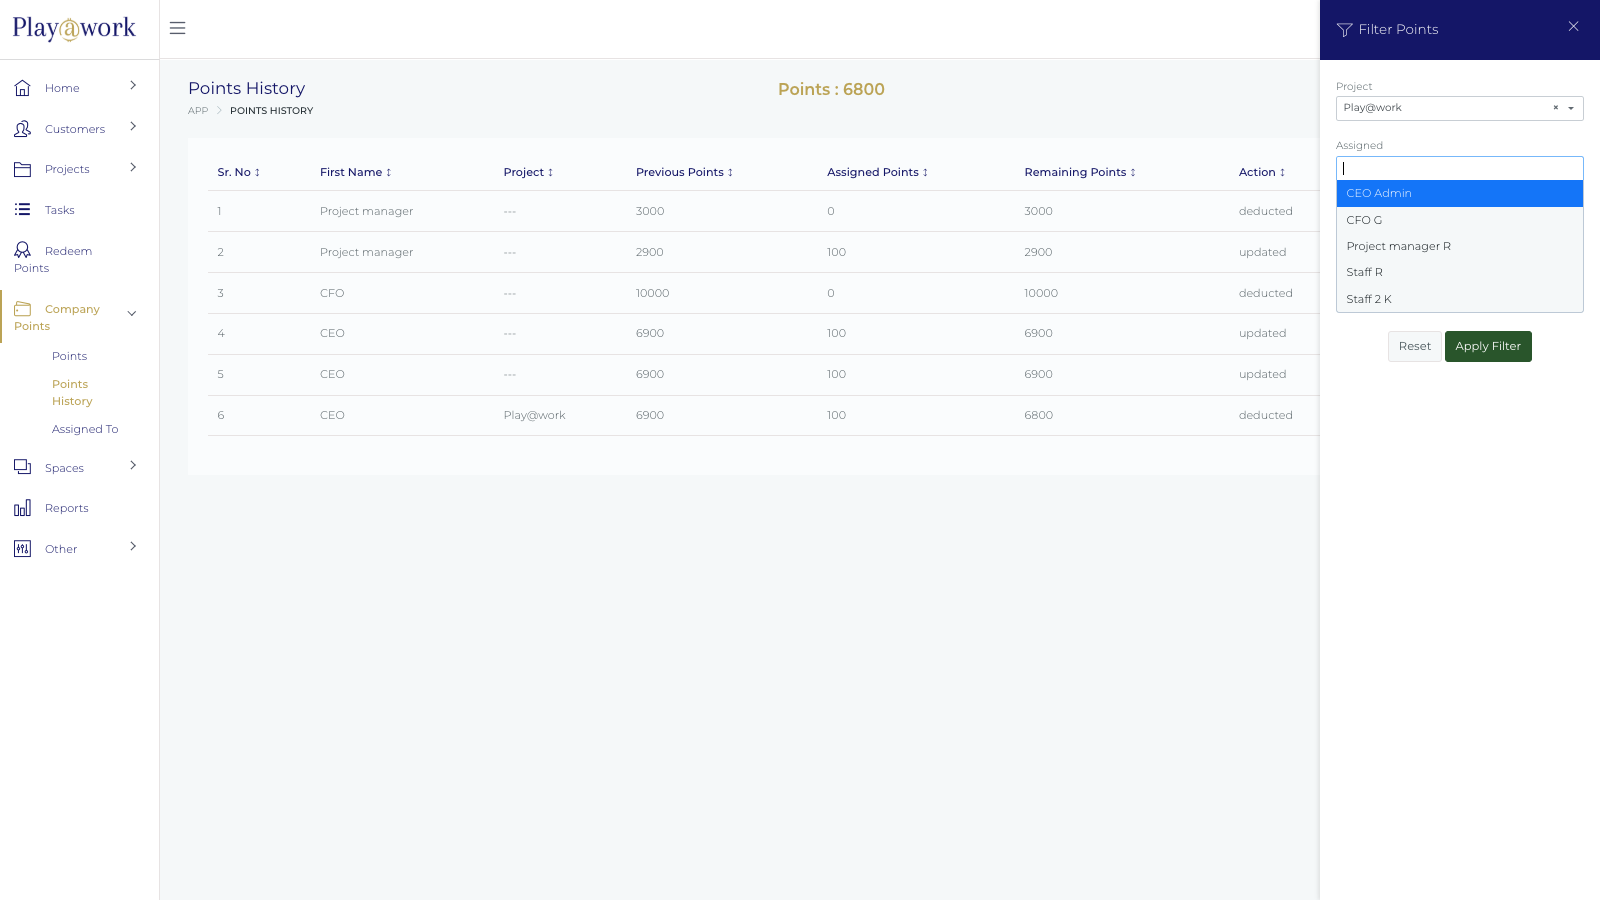
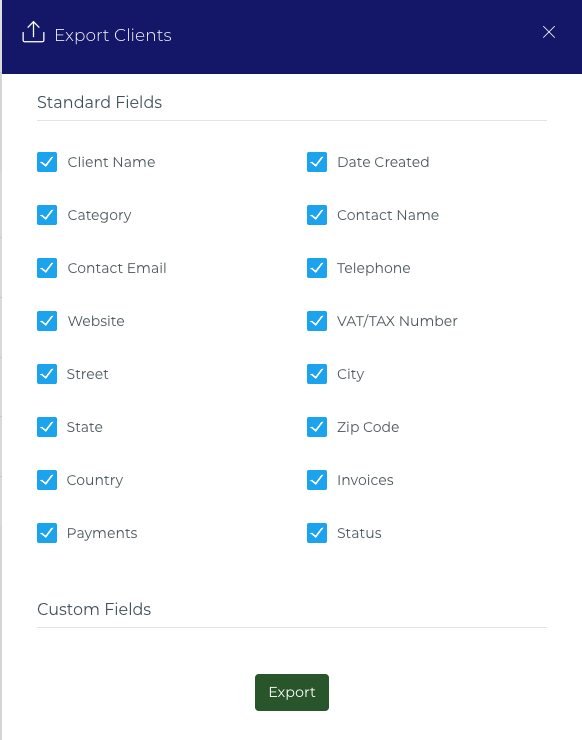
Exporting Data
Points and time costs can be exported as CSV reports per project.
These reports include total points, time costs, and bonus allocations.
Integration with Payroll & Accounting
CSV reports can be imported into a payroll suite or accounting system.
This ensures accurate project billing and employee compensation
Strategic Budgeting:
Allocate realistic point budgets based on project profitability and expected success.
Performance-Based Rewards:
Use the final review process to ensure points reflect each contributor’s effort and impact.
Transparency & Communication:
Keep teams informed about how points are awarded, adjusted, and redeemed.
For additional guidance, explore our Knowledge Base or reach out to our support team. You can also watch our training videos for step-by-step instructions on specific features.
Thank you for choosing Play @ Work. We’re here to help you succeed!
Welcome to Play @ Work! This guide will walk you through managing customers, creating projects, assigning tasks, and handling point attribution. Follow these steps to streamline your organization’s workflow.
For more detailed instructions, visit our Knowledge Base or reach out to our support team. You can also watch training videos to learn more about specific features.
Thank you for using Play @ Work. We’re here to help you succeed!
Play @ Work provides powerful tools to help individuals and teams set goals, celebrate achievements, and foster healthy competition. This article explains how to use the Vision Board, Accomplishment Tracking, and Leaderboard features effectively.
The Vision Board feature allows all roles to set and track personal and professional objectives, ensuring alignment with organizational goals.
Key Features:
Create Objectives:
Add short-term, medium-term, and long-term goals.
Assign point values to each goal to track progress.
Visual Progress:
View your progress toward goals as tasks and projects are completed.
Stay motivated by seeing how your daily efforts contribute to your bigger aspirations.
How to Use:
Navigate to the Vision Board section in your account.
Add your goals with descriptions and point values.
Update goals as progress is made, and mark them as achieved when completed.
The Accomplishment Board allows you to document and reflect on your achievements, fostering a sense of pride and motivation.
Key Features:
Track Milestones:
Automatically log completed tasks and projects.
Add past accomplishments manually to document your journey.
Highlight Achievements:
Use the board to showcase major milestones and contributions.
Inspire team members by sharing accomplishments.
How to Use:
Access the Accomplishment Board from the main menu.
Add past achievements or view automatically logged milestones.
Reflect on your progress and share successes with your team.
The Leaderboard feature ranks team members based on their contributions, encouraging collaboration and quality work.
Key Features:
Team Rankings:
View rankings for individuals or teams based on points earned and tasks completed.
Motivation Through Competition:
Foster a culture of friendly competition and recognition.
Reward top performers to encourage sustained excellence.
How to Use:
Navigate to the Leaderboard section in your account.
Review individual or team rankings.
Use the leaderboard insights to recognize and reward top performers.
Align Goals with Objectives:
Use the Vision Board to align personal and professional goals with team and organizational objectives.
Celebrate Wins:
Regularly update the Accomplishment Board to keep morale high.
Acknowledge team and individual achievements during meetings.
Promote Collaboration:
Use the Leaderboard to inspire team members to work together while maintaining healthy competition.
For additional guidance, explore our Knowledge Base or reach out to our support team. You can also watch our training videos for step-by-step instructions on specific features.
Thank you for choosing Play @ Work. We’re here to help you succeed!
This guide shows team members how to update their personal information, including names, contact details and profile pictures, on the Play at work.io Platform.
Maintaining an accurate and up-to-date profile helps your team members collaborate more effectively and recognize you instantly.
To update your user profile, follow these steps:
Access Your Profile Menu:
Log in to the Play at work.io platform.
Click on your User Avatar (or profile picture) located in the top-right corner of the screen.
A dropdown menu will appear. Select My Profile (or Profile Settings).
Edit General Information:
You will be taken to your profile page, which typically contains fields for:
First Name
Last Name
Email Address (Your login ID)
Phone Number
Job Title (If applicable)
Make all necessary changes to your personal and professional details.
Update Your Profile Picture (Avatar):
In the profile section, look for the current image or avatar placeholder.
Click the Upload or Change Avatar button to select a new image file from your computer.
Save Your Changes:
After making all desired updates (in both the general information and security sections), be sure to click the Save Changes or Update Profile button at the bottom of the page to apply your modifications.
This guide shows you how to customize your personal notification settings on the Play at work.io Platform so you only receive alerts that are most important to your workflow.
The Play at work.io platform allows you to fine-tune the types of notifications you receive, across two main channels: Email and In-App Alerts.
You can specify exactly which events trigger an alert for you (e.g., when a task is assigned, a comment is posted, or a project status changes).
Follow the steps below to manage your notification settings:
Access Your Profile Menu:
Log in to the Play at work.io platform.
Click on your User Avatar (or profile picture) in the top-right corner of the application.
From the dropdown menu, select My Profile (or Profile Settings).
Navigate to Notifications:
Within your profile settings, look for a tab or section labeled Notifications or Notification Settings.
Configure Preferences:
You will see a list of different events (e.g., "New Task Assigned," "Client Reply," "Project Status Change").
Next to each event, you can typically find checkboxes or toggles for:
Email: Check this box if you want to receive an email alert for this event.
In-App: Check this box if you want to receive a push notification or alert directly within the Play at work.io platform.
Save Your Changes:
Once you have selected or deselected your desired options for all events, ensure you click the Save Changes or Update button to apply your new notification settings.
This guide outlines the simple, secure process for changing your login credentials on the Play at work.io Platform. Regularly updating your password is a key step in maintaining account security.
To securely update your password for your Play at work.io account, follow these instructions:
Access Your Profile Settings:
Log in to the Play at work.io platform.
Click on your User Avatar (or profile picture) typically found in the top-right corner of the application.
From the dropdown menu that appears, select My Profile (or Profile Settings).
Navigate to Security:
Within your profile settings page, look for a dedicated tab or section labeled Change Password or Security.
Enter Your Credentials:
You will be presented with three required fields for verification and change:
Current Password: Enter the password you are currently using to log in.
New Password: Enter your desired new password. (Choose a strong, unique password for maximum security.)
Confirm New Password: Re-enter the new password exactly as typed above to confirm.
Finalize the Update:
Click the Update Password or Save Changes button.
Once successfully saved, your new password will be immediately active, and you will need to use it for all future logins to the Play at work.io Platform.
This article provides an in-depth explanation of the User Role system, the powerful access control feature within the Play at work.io Platform.
User Roles are the core of our platform's security, defining the exact level of access and permissions a team member will have when using the application.
On the Roles Settings page, you possess the full capability to:
Create new, custom roles tailored to specific job functions.
Edit the permissions of existing roles (except for the built-in Client roles).
Delete unnecessary roles.
Roles are applied exclusively to Team Members. Access levels for Client users are predefined within the application and cannot be modified via this system at this time. Once a role is created, you can assign it when creating or editing a team member's profile.
To begin managing your roles:
Navigate to Settings (⚙️ icon) on your dashboard.
Select User Roles (or Roles & Permissions) from the administration menu.
(The documentation refers to a screenshot named settings-roles that visually confirms this navigation.)
For every resource in the Play at work.io Platform (e.g., Projects, Invoices, Tasks), you can grant highly specific access by defining one of four permission levels for a given role:
By default, role permissions are constrained: they only apply to resources that a user has created themselves or resources that have been explicitly assigned to them.
If you want a role to grant permissions to all resources of that type across the entire organization (granting an admin-level permission for that resource), you must click on the Global option for that resource's permission setting.
This article guides you through the core functionality of client management within the Play at work.io Platform, starting with the central hub: the Client List Page.
Managing your clients is designed to be intuitive and efficient on Play at work.io. All client interactions begin on the Client List Page, which provides a comprehensive view of your entire customer base.
You can access this page via the main menu:
From the Client List Page, you have immediate access to all essential client management actions and summary data:
Create a new client account.
Edit an existing client account's details.
Delete a client account (Note: Use caution when deleting accounts).
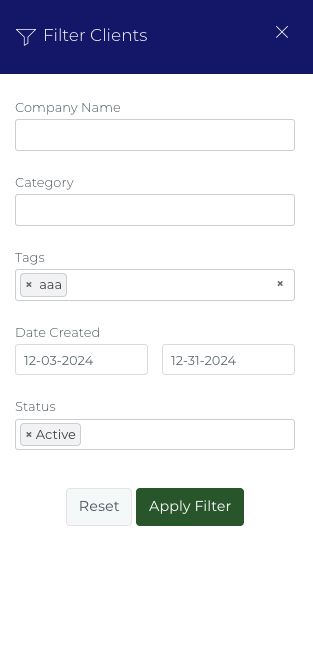
Filter Clients: Utilize the detailed filter panel to segment and narrow down your client list based on various criteria.
Search: Use the free text search box to quickly find clients by name or other relevant keywords.
The list view immediately shows the most important data points for each client:
Client ID: The unique identifier for the account.
Company Name: The name of the client organization.
Main Contact: The primary account owner or contact person.
Project Count: The number of active or completed projects associated with the client.
Total Invoices: The aggregate value of all invoices raised for this client.
Tags: Custom tags for quickly identifying key attributes (e.g., VIP, Retainer, New Lead).
Category: The classification used to group your clients (e.g., Design, Marketing, Enterprise).
The Play at work.io Platform makes it simple to manage your clients and customers. You can easily create new client accounts, each with its own secure access to the dedicated client dashboard.
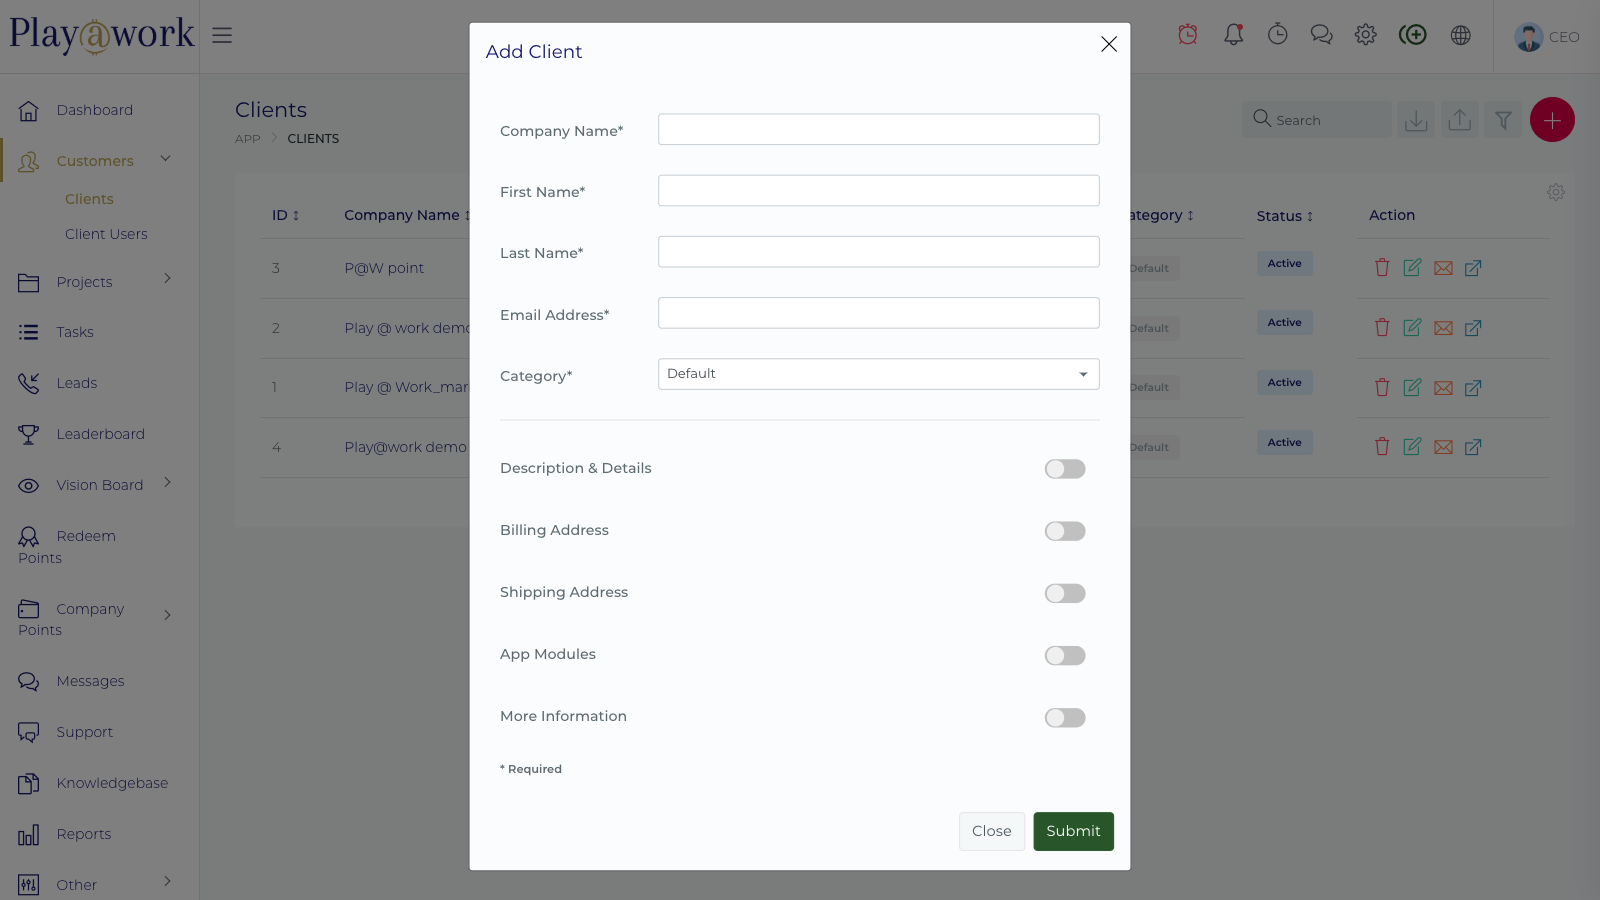
You can quickly initiate the creation of a new client account from anywhere in the platform by clicking the Quick Add icon (usually a + symbol) or by navigating to the Client List Page and clicking the "Add Client" button.
To successfully create a client account, you must provide the following details:
Company Name: If your client is an individual without a company, you can simply use their full name in this field.
First Name
Last Name
Email Address (This will be the main contact's login ID)
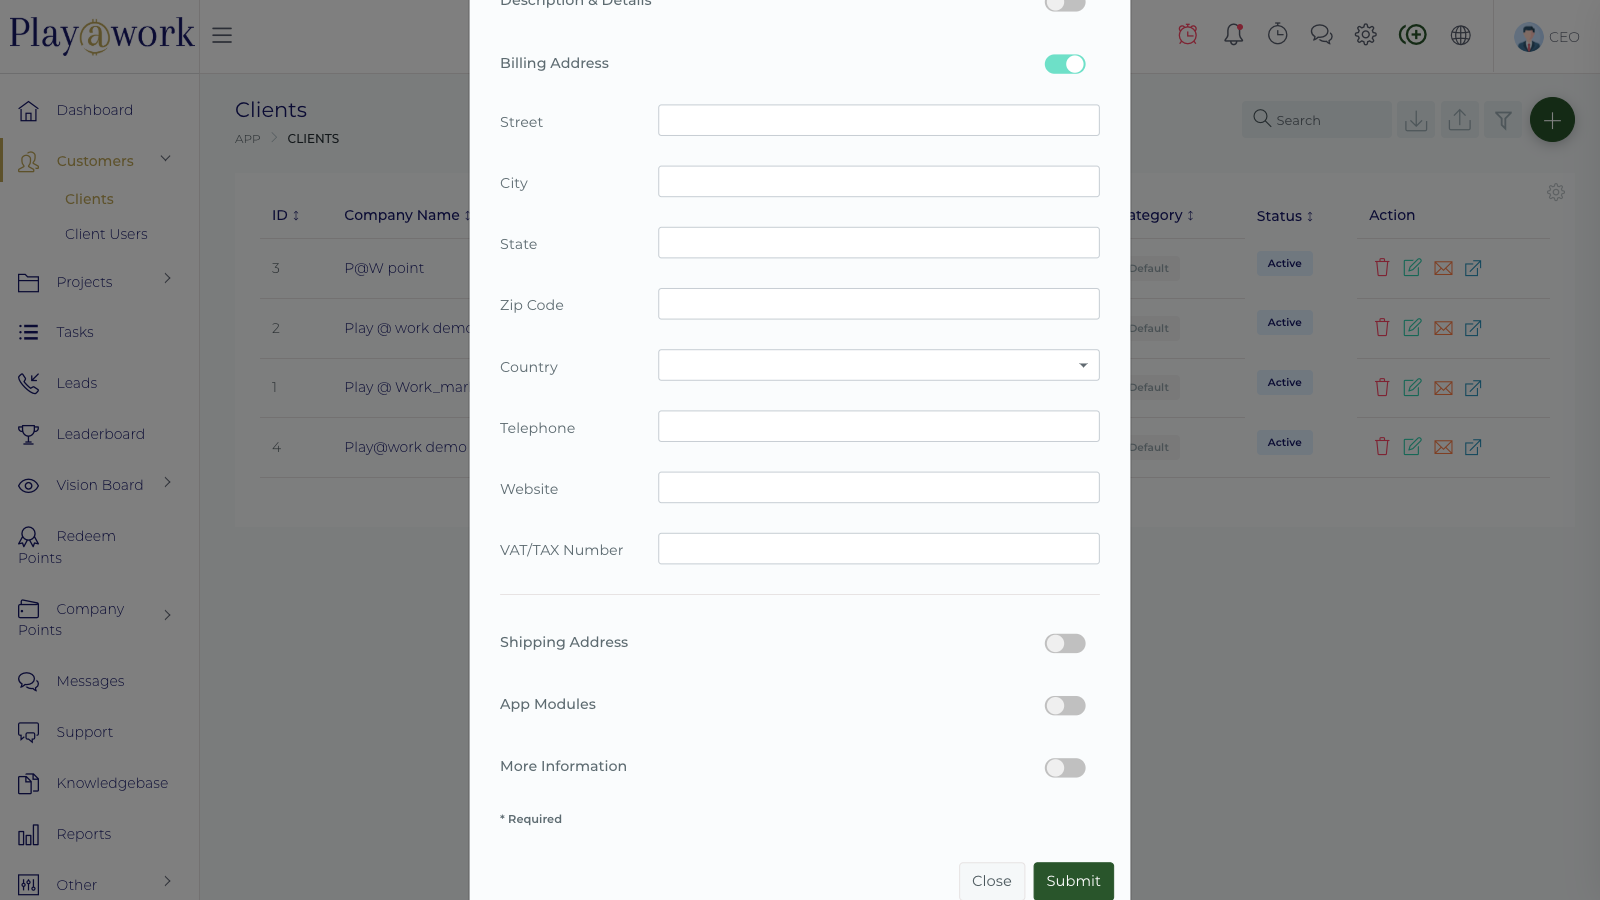
You can provide the following details during or after creation:
Billing Address
Shipping Address
Other Details
Tags: Use tags to categorize, identify key attributes, or segment your clients (e.g., "High-Priority," "Design Partner," "Annual Retainer").
To update any details for an existing client:
Navigate to the Client List Page.
Locate the client you wish to modify.
Click the Edit Client Icon (often a pencil or gear icon) associated with that client's entry.
Make the necessary changes (to contact info, company name, address, etc.).
Click Save.
Use extreme caution when performing this action, as it is irreversible.
To delete a client account:
Navigate to the Client List Page.
Locate the client you wish to remove.
Click the Delete Client Icon (often a trash can icon) associated with that client's entry.
Confirm the deletion when prompted.
When you delete a client account, all associated data and resources linked to that client will also be permanently deleted from the Play at work.io Platform.
This includes, but is not limited to:
Projects
Client Users (their logins)
Invoices
Tasks
Files
Payments
Estimates/Proposals
All related activity and history
The Custom Fields feature on the Play at work.io Platform gives you the power to extend and personalize the data you collect about your clients. This allows you to capture business-specific information beyond the standard, built-in fields.
To start creating and managing your custom client fields, navigate to the administrative settings:
On the Custom Fields page, you can create various types of fields to suit the specific data you need to capture. The available field types include:
Simple Text: For short, single-line text inputs (e.g., "Account Nickname").
Paragraph (Long Text): For extensive notes or longer descriptions.
Number: For capturing whole numbers (e.g., "Number of Employees").
Decimal: For capturing numerical values with decimal points (e.g., "Hourly Rate").
Date: For capturing specific dates (e.g., "Contract Renewal Date").
Drop Down List: Allows users to select one option from a predefined list (e.g., "Industry Vertical").
Check Box: A simple Yes/No or True/False toggle.
You can configure exactly where and how your custom field data appears across the platform:
Use in the standard form: Toggles whether the field is visible when creating a new client account.
Show on client profile: Determines if the data is displayed on the client's main profile page.
Show on invoices (and estimates): Displays the captured data on official financial documents.
Show in filter panel: Makes the custom field an available option when searching and filtering your list of clients.
Once your custom fields are created, you can further refine how they appear on the "Add New Client" form.
Click on the Standard Form menu item (located near the Custom Fields list).
You will be able to:
Reorder Fields: Use drag-and-drop functionality to arrange the sequence of fields on the form.
Specify Mandatory Status: Mark specific custom fields as mandatory (required), ensuring your team captures this crucial data before a new client account can be saved.
The Client Settings page within the Play at work.io Platform is where Administrators configure the organization-wide behavior for client accounts and the client-facing portal.
To access these settings, navigate to:
Here are the key configuration options available:
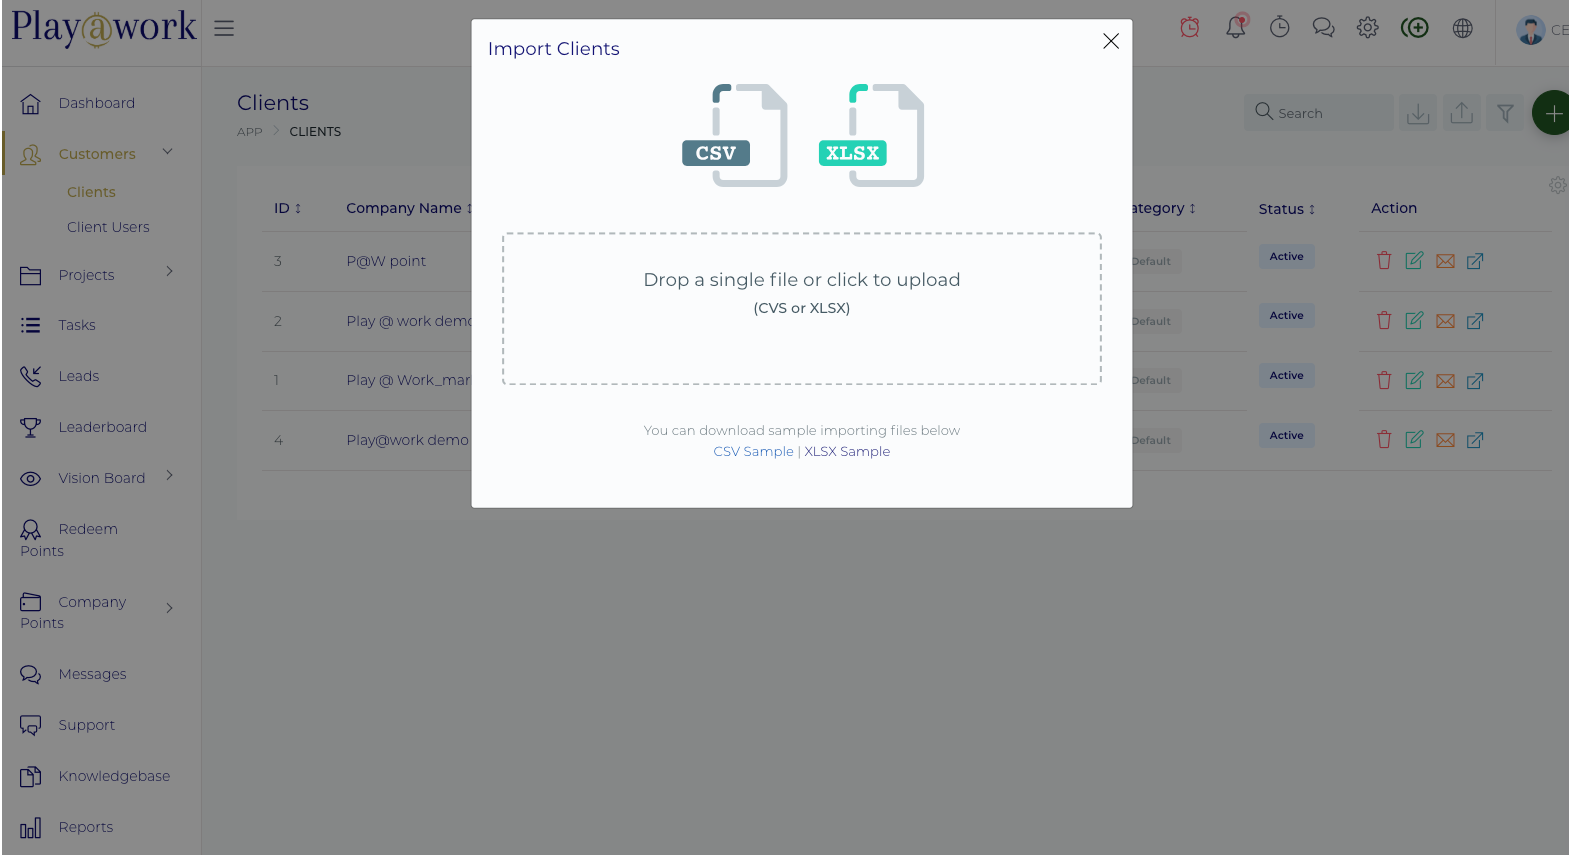
This comprehensive guide walks you through the process of quickly migrating multiple clients into the Play at work.io Platform using our bulk import feature, saving you significant time and effort when setting up your client database.
The Play at work.io Platform allows you to import hundreds of client accounts in a matter of seconds using either CSV or Excel (XLSX) files. This feature is crucial when migrating client data from previous systems or populating a large initial database. For each successfully imported row, the system automatically creates both the client organization profile and the primary client user for that account.
Follow these three steps to upload your client data:
Click on Clients in the main menu.
Locate and click on the Import Clients icon (usually a down-arrow or upload icon) on the Client List page.
A modal window will appear with instructions. Download the provided sample file (in either CSV or XLSX format) to see the exact structure required.
Fill this template with your client data. Important: Your data file must strictly adhere to the column headers and format of the sample template provided.
Once complete, drag and drop your final CSV or XLSX file onto the designated upload area in the modal window.
After uploading, the system will process the file and display a summary of the results:
The total number of clients successfully imported.
A list of any errors encountered during the import process (e.g., failed rows).
To ensure a smooth import, please adhere to these requirements:
Once the process is complete:
Your new clients will immediately appear on your main Client List Page.
Each client entry now has both an organization profile and a primary client user created.
The newly created client users will receive an email with their login credentials and a link to the Play at work.io Client Portal, provided that client email notifications are enabled in your global settings.
This article introduces the core of project management within the Play at work.io Platform: the central Project List Page.
Managing your projects is intuitive and streamlined, giving you instant access to your entire portfolio of work.
The central starting point for all project activity is the Project List Page.
You access this page via the main menu:
From the Project List Page, you have full control over your projects. You are able to view and execute the following actions:
The Play at work.io Platform simplifies project management, enabling you, your team, and your clients to share information and collaborate effectively on every deliverable.
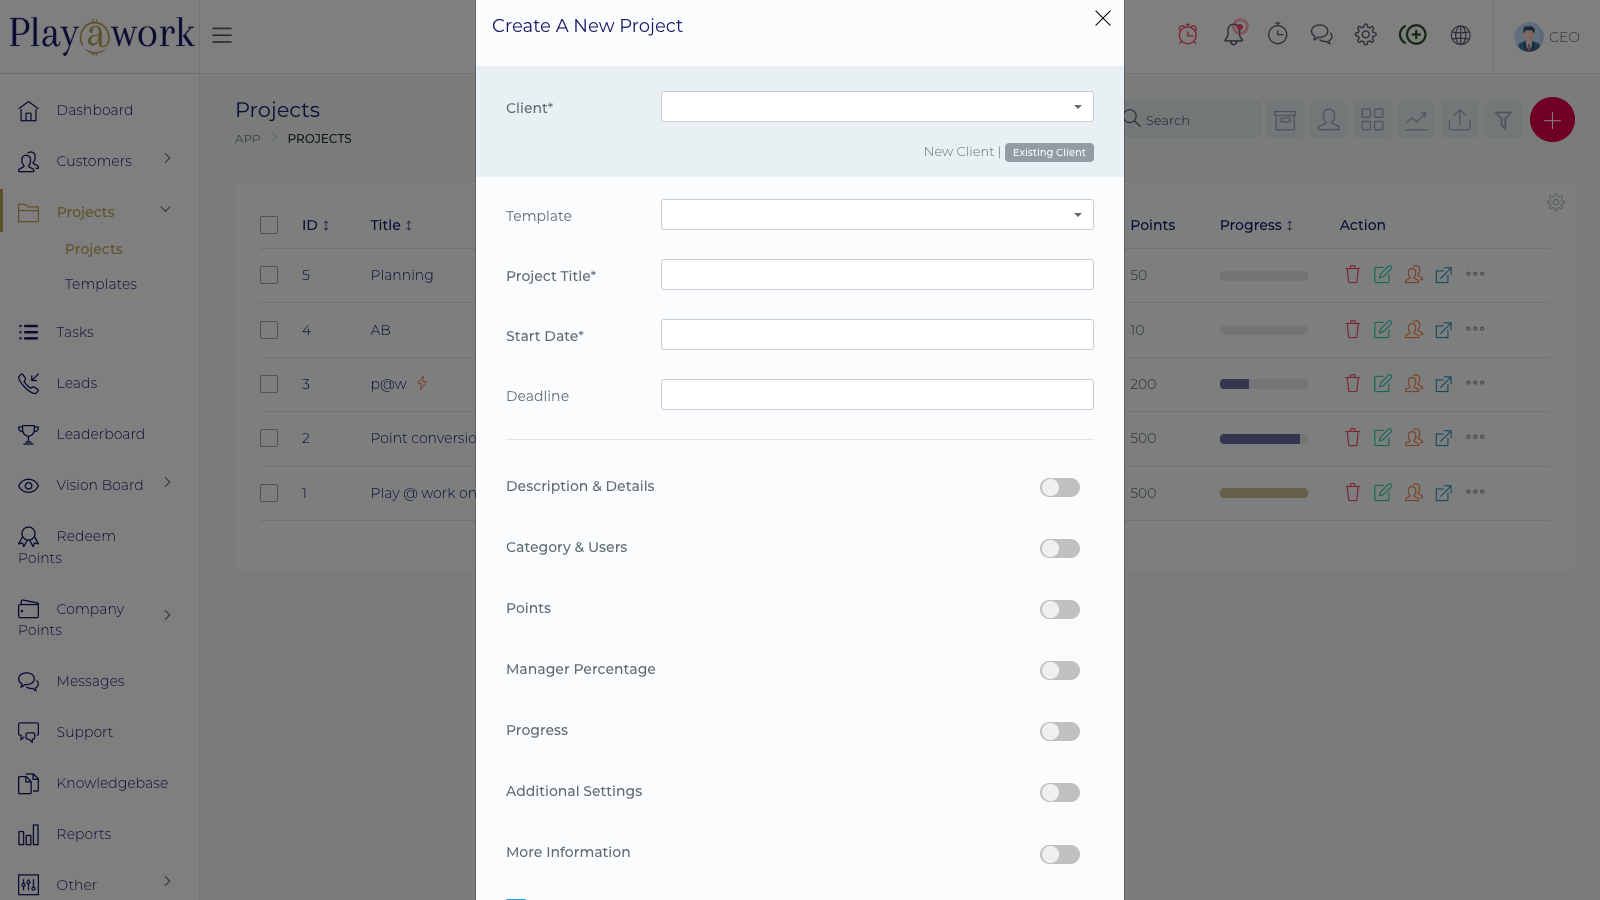
You can start a new project instantly using two methods:
Click the Quick Add icon (usually visible in the main header).
Click the + Add Project Button on the Project List Page.
To launch any project, the following fields are required:
Project Title*
Client* (The client organization this project is for)
Start Date*
When creating or editing a project, you can define detailed settings:
To modify a project's settings or information:
Navigate to the Project List Page.
Click the Edit Icon (often a pencil) next to the project name.
For additional editing options (e.g., managing specific settings tabs), look for the More Icon (often three dots) on the project list or within the project profile.
Use Extreme Caution: Deleting a project is irreversible and removes all associated data.
Navigate to the Project List Page.
Click the Delete Icon (often a trash can) next to the project name.
Confirm the deletion when prompted.
Deleting a project will permanently remove all linked items, including:
Tasks
Invoices
Files
Comments
Timesheets
And all other related resources
The Project Management section is the central hub for handling all aspects of a specific project within the Play at work.io Platform. It provides easy, organized access to every resource and activity linked to the deliverable, facilitating seamless collaboration between your team and the client.
When you open a project, you are presented with a detailed profile organized into various tabs and sections:
From this profile view, you also have quick access to Edit the project details and, if necessary, Delete the project entirely.
The Play at work.io Platform gives you the flexibility to choose how you visualize your projects, ensuring your workspace supports your unique workflow. You can easily toggle between two primary views for your project list.
An important feature of these views is that they are set on a per-user basis. This means you can select your preferred view mode without affecting how other team members see their project list.
You can toggle between the different views using the button located near the top of the project list.
The List View is the standard, default view mode for your projects.
In this mode, your projects are displayed in a familiar table list format. This view is ideal for quickly scanning key metrics, sorting columns, and managing a large number of projects efficiently.
To access this view mode, simply click the toggle button.
The Card View provides a more visual, organized layout where each project is represented by a dedicated card. This mode is particularly useful for visual thinkers and for quickly identifying projects.
If the Project Cover Images feature is enabled, this view mode will also display those images directly on the project cards.
Ready to find the view that works best for your projects? Experiment with the toggle button on your Projects List Page!
This article guides you through the process of using the new Automated Payout System and viewing the detailed financial tracking for projects on the Play at work.io Platform.
This feature centralizes your profit-sharing, ensuring accurate, transparent, and instant distribution of funds and bonuses to team members.
Once a project is complete, the Play at work.io platform simplifies the process of distributing profits and bonuses with a single-click action.
Steps to Trigger Payout:
Mark the Project as Complete: From the Projects List, ensure the project's status is set to "Completed".
Access Project Details: Click on the completed project title to view the Project Overview.
Initiate Payout: Scroll down on the project overview page to the Project Cost Summary section. The "Trigger Payout" button will be visible at the bottom of the financial summary. Click it to begin the allocation process.
Review and Confirm: You will be taken to the Payout Summary page, which displays:
Allocation Summary: This includes the Total Profits, Company Reserve, and Total Staff Bonuses.
Staff Bonus Details: A breakdown of the Bonus Amount and Percentage allocated to each team member.
Finalize Ledger Processing: Check the declaration box to confirm you have reviewed the details. Click the "Process Payout" button to automatically update the financial ledger and finalize the distribution.
The Ledger System Financial Accounting Dashboard provides a real-time, comprehensive view of all funds, reserves, and individual user balances after the payout is processed.
Viewing the Ledger:
Navigate to the Ledger: Access the Ledger Dashboard via the main menu.
Review Balances: The top of the dashboard shows the Total Ledger Balance, User Balance Total, and Company Reserve Total.
Account Summary: The Account Summary table breaks down the balances for the Company Reserve Account and each User Account.
Transaction History: The Recent Transactions panel shows the most recent debits and credits, including the Bonus from project allocation and the Company Reserve allocation.
Detailed User History: You can click "View Account Details" on any user or reserve account in the summary table to see a detailed Transaction History for that specific account.
Team members can easily view their earned balances and submit withdrawal requests directly from their profile.
Managing Your Balance:
Access Wallet: Click your User Avatar in the top-right corner of the dashboard. The dropdown menu displays your current Wallet Balance.
Withdrawal Request: Click "Withdraw Balance".
Submit Request: Enter the withdrawal amount (with a minimum amount specified) and a description (optional). Click "Submit Withdrawal".
Admin Approval (Administrator/Field Officer):
Admins can view all pending withdrawal requests in the Withdrawal Requests section.
To process a request, click the "Approve" action button and confirm the action. This action debits the amount from the user's account and updates the ledger.
Copyright © 2025 . All rights reserved